Monday, January 18, 2010

How to Install Google Analytics on Blogger

Google Analytics Blogger LogoWouldn’t it be nice to know how many people actually visited your blog each day? How about knowing which of your posts are the most popular? Well surprisingly Blogger doesn’t currently offer any native blog analytics but fortunately there is Google Analytics — available for free.

Google Analytics is a great tool that will show you all sorts of useful information about how people found your blog, keywords they searched on to find you, where they came from and even how long they stayed. You’ll learn more about where your visitors come from and how they interact with your blog. This is a must tool if you are trying to build a profitable blog otherwise you are flying blind!

This article will show you how to add Google Analytics to your Blogger blog. It’s a fairly simple process and doesn’t require any technical skill at all.


Step #1 – Setup a Google Analytics Account

Go to Google Analytics and sign in using your Blogger login. If your account doesn’t work for some reason, you can create a new one instead. Once you login you’ll see a screen that looks like this:

Google Analytics Blogger Sign Up Step 1

Click on the “Sign Up >>” button and proceed to the next step which will ask you for your general information. Website URL, Account Name, Country, and Time Zone. The screen will look like this:
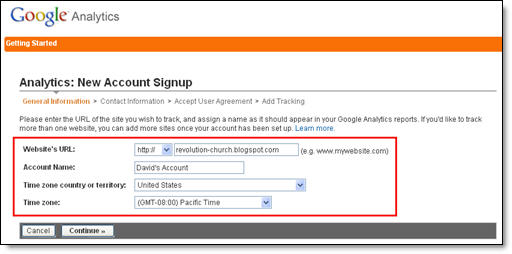
Google Analytics Blogger Step 2

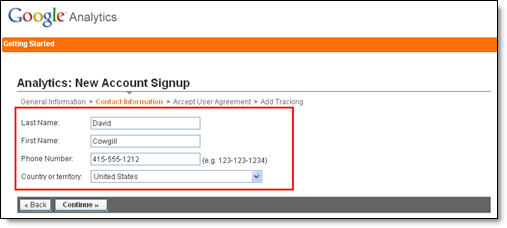
If you noticed, I just put my Blogger url (without the http://) and called it “David’s Account” because this is your top-level container for 1 or 100 different websites so it’s a good idea to name it something more general. The next step will ask you for your contact information which includes your first name, last name, phone number, and country. Easy so far right? :-)

Google Analytics Blogger Step 3

Your last step in signing up will ask you to accept the user agreement terms and conditions which you should read (just kidding…who actually ever reads these entire legal terms anyhow?).
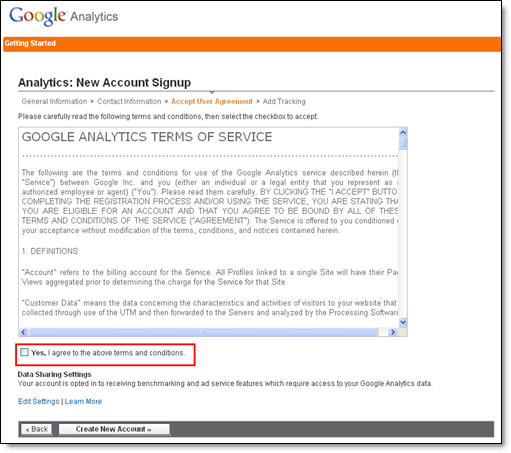
Google Analytics Blogger Step 4

Now this next screen is very important. This is the code you will need to copy and paste into your blogger template. Go ahead and click into the box and it will automatically highlight the entire block of code for you. Now you need to copy that code and paste it into notepad or into a MS Word document. Save it as you’ll need to use it later.
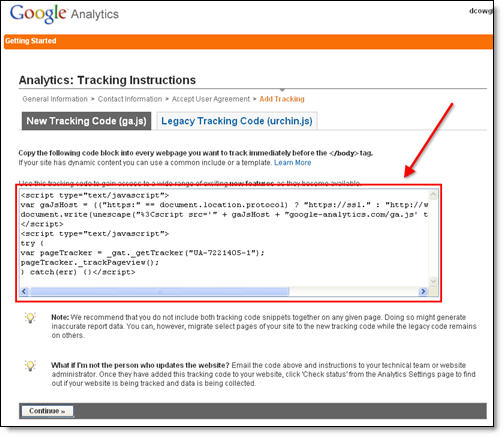

Google Analytics Blogger Step 5

After you click on the “continue >>” button you will be taken to your brand new Google Analytics dashboard! You will see your blogger blog listed but with no analytical data….yet.
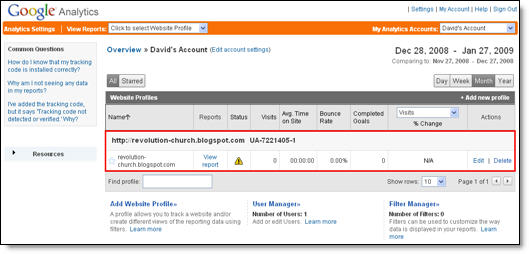
Google Analytics Blogger Dashboard

Ok, now you are done with setting up your Google Analytics account. The next step is placing the tracking code into your Blogger template so it can report back to Google Analytics and provide you with some cool data points.

Step #2 – Adding GA Tracking Code to Your Blogger Template

This is not a very difficult step even if you are afraid to touch your template code. Login to your Blogger account and then click on the “Layout” => “Edit HTML” tabs. This will bring you to the template code. Before you make any changes, I advice you to back up your template just in case there are any problems. After you’ve done so, continue reading.


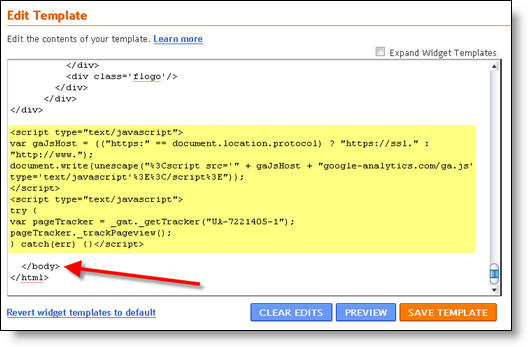
Now in the edit template html code window, scroll all the way to the bottom of your template code and look for the </body> tag. There should only be one of these closing tags in your template. If you can’t find it then your template wasn’t properly created and you should add one right above the </html> tag.The </html> tag should always be your last line of code in your template. It signifies the end of your template.

Ok, now go back to the code you saved before in a Word Doc from Google Analytics. You are going to copy it and paste it right above the </body> tag as illustrated in the image below. The yellow highlighted code is the new GA code I just pasted into my template.

blogger google analytics code 2

Save your template and you shouldn’t get any error messages. If you do, it’s most likely not related to this GA code and something else with your template itself. Assuming you’ve been successful with your save, you are all done embedding the GA code in your template!

Step #3 – Confirm Google Analytics is Tracking

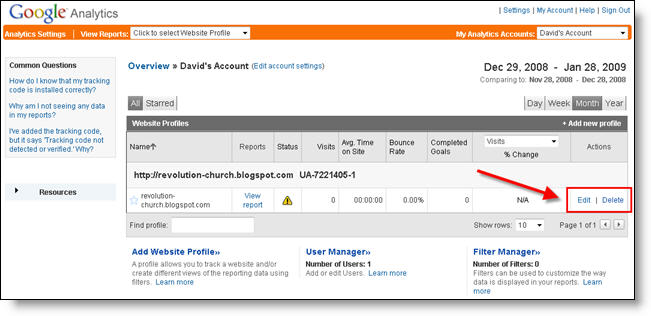
Go back into your Google Analytics account and look at your dashboard. Most likely you will see a little yellow exclamation mark under the “status” column that looks like this: google analytics tracking not installed. This means everything isn’t working properly yet which is fine because we are about to tell GA we just added the code. From your dashboard, click on the “edit” link which is located to the far right.

Google Analytics Blogger Dashboard Edit

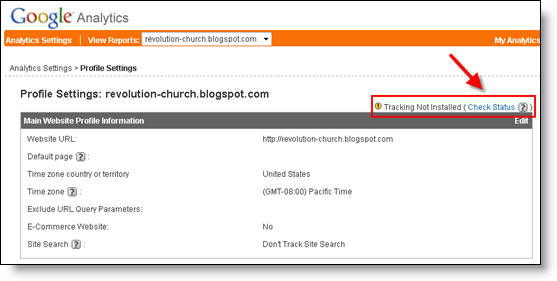
After you click on that link, you’ll see another screen like below. It will say “Tracking Not Installed” followed by a link “Check Status”. You’ll want to go ahead and click on that link which will tell GA to visit your site and look for the new code you just pasted in your template.
Google Analytics Blogger Dashboard Check Code

Assuming you pasted the code in there as instructed above, GA will find the new code and begin tracking everything on your blog. If you are still having problems, it’s most likely something to do with GA and you should read their help guide to troubleshoot your problem.

Google Analytics Blogger Dashboard Success

The message seen here, “Waiting for Data” means you have correctly setup GA and data is being gathered! Click on the top left Google Analytics logo and it will take you back to your dashboard. From there click on the “View report” link and that’s where all your very important Blogger visitor data will start appearing!
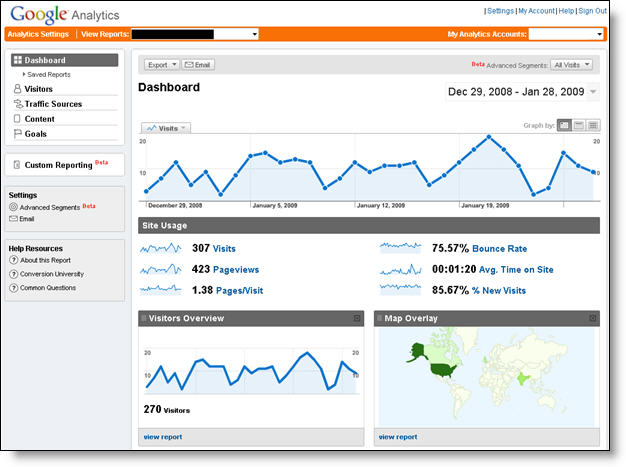

Google Analytics Blogger Dashboard Results

Now it usually takes an hour or so before you will see any data (maybe longer if you don’t get much traffic to your blog) so please be patient. Trust me, you’ll be logging in at least once a day just to see how much traffic your blog is getting. It’s very addicting and powerful information to learn from. You’ll be surprised which posts are your most popular and what countries people are coming from to read your blog.

Google Analytics is very powerful and we have just learned how to install it into your Blogger template. We haven’t even scratched the surface on the features and reporting it can do. For most Bloggers, this will be enough. Data will be collected and you will just review it. Others with more in-depth goals (like selling products or services, creating a sales funnel, etc) will want to spend more time learning GA. Hope you enjoyed the tutorial and don’t blame me for your new found addiction!

Saturday, January 16, 2010

Create a Google Profile

Thought of creating a Google profile? With a Google profile page you can:

  • Share your content on the web.
  • Links to your blogs.
  • Online photos from Picasa and Flickr.
  • Links to your other online profiles like Facebook and LinkedIn.
  • Create a bio about yourself on your About tab.
  • Provide contact information and enable send me a messge.

Create a Google Profile

  1. You will need a Google account first.
  2. Go to Create Your Profile at Google.
  3. Over on the right is a button Create my profile, click it.

    Switches to Google account login box


  4. Log into your Google account.

    Next screen asks you to update your password recovery information. Update it then click Save and continue button at the bottom of the page.

    You now are taken to your profile page.

  5. In the top right, beside your login name there is a Edit my Profile link, click it.

    You are taken to the Edit your profile page. On your Edit your profile page the About tab is activated.

About Tab Google Profile

  1. On the About tab the first part is where you:
    • Fill in your first and last name.
    • Upload a picture of yourself.
    • Fill in your nickname.
    • Other names.
    • What sex you are. There is the option to not to say if you prefer to keep this confidential.

    To the right of your name section you have the following choices:

    • To display your full name so you can be found in searches.
    • Allow people to contact you without knowing your email address.
    • To display those who you follow and the people who are following you.
  2. The second part of your About tab is where you can enter more personal stuff about you:
    • Where you grew up.
    • Where you live now and where you have lived.
    • What your profession is, current employer, past employers and schools you are currently attending or have attended.
  3. There is a box a bit lower down on the About tab where you can add a short bio.

    An HTML editor is available to format your text and add links.


  4. Below the bio section is where you can add links.

    This is where you can add links to your other online profiles and website.

  5. Check your information over. Google shows you your profile link to share.
  6. Scroll down to the bottom of the page can click Save changes.

That’s it! You have now completed the About tab of your Google profile.

Photos Tab Google Profile

The photos tab is where you add a photo strip at the top of your profile.


  1. Click the Photos link beside the About link at the top of the screen.

    Switches to the photo editing screen.

  2. Picasa is selected by default.

    If you do not have a Picasa account yet or if you photos are not public, Google will let you know it can not find one for you using this user name/Google account.

    Click add photos if you have a Picasa account under this user account.

  3. The next option is Flickr.

    Click the circle (radio button) beside Flickr if you want to add photos from your Flickr account.

    Enter your Flickr username, ID, or email address the click the Check button to the right.

    Click the Add photos button below to add photos from your Flickr account.


  4. The third option is where you can add another photo service you use.

    Click the circle (radio button) beside Other photo service.

    Fill in the url or feed of your photo service you wish to add then click the Find feed button to the right.

    Click the Add photos below to add photos from your other photo service.

You are now finished adding photos to your Google profile.

Next thing to fill out is your contact information.

Contact Info Tab Google Profile

There is a note on the this screen that the information you enter on this page is not public unless you decide to make it public.


  1. Click the Contact Info link beside the Photo links at the top of the screen.

    Switches to the Contact Info screen.

  2. On the Contact Info screen you can add:
    • Email addresses
    • Addresses
    • Phone numbers including your mobile
    • Instant messenging user name
    • Your birthday (just month and day)
  3. Next select who can see this contact information.
    • Your contacts group
    • Your friends group
    • Your family group
    • Your co-workers group
  4. When you are all done, scroll down to the bottom and click Save changes.

With your Google profile now complete, you can start sharing your profile link with friends, family, co-workers and anyone else you wish.

Be sure to keep your Google profile up to date. It is yet another way for people to find you on the net!

Friday, January 15, 2010

Create Account at Google

Create Google Account

To use the services available at Google you need a Google account first.

What Services Can I Access with My Google Account?

Google provides a number of services. Below are a few of the services you might use as a business owner:
  • Google Profiles
  • Gmail
  • Webmaster Tools
  • Google Analytics
  • Google Alerts
  • Google Groups
  • Google Documents
  • Google AdWords

Security Note Regarding Google Accounts and Services

Your Google Account is hooked up with all the Google Services you use therefore, if you decide to have someone manage your Google Analytics account for you they will have access to all the other services you use at Google. Consider creating a separate account for the business services you will be using for your website so if you hire someone to manage these services for you, they don’t have access to your Gmail account or any other personal services you use at Google.

How to Create an Account at Google

Before you can create an account at Google you will need an email address and a strong password in mind The password needs to be at least 8 characters long.
  1. Go to the Create an Account page.
  2. The first piece of information they ask for is an email address. This will be part of your login information.
    Fill in an existing email address you have.
  3. Next, they want a password.
    Type in your chosen password in the box next to Choose a password:
    Over on the right of the box where you typed the password it will indicate how strong your password is.
  4. In the next box down retype your password.
  5. Decide if you want to stay logged in.
    By default the stay logged in box is checked. This puts a cookie on the computer where you are working to keep you logged in at Google. This is fine if the machine is your own but if you are doing this on a public machine (e.g. at the library) then uncheck it because you probably will forget to log out when you leave. If you don’t logout at the library then the next person to use the machine has access to your account.
  6. The next thing to consider is Web History.
    Creating a Google Account will enable Web History. Web History is a feature
    that will provide you with a more personalized experience on Google that
    includes more relevant search results and recommendations.
    What this means is Google is going to track what sites you visit and then start presenting sites in the results that they think suit your past web searching history.
  7. Default Homepage is next. It is checked by default to change your homepage to Google.
    If you leave this checked, the homepage of your browser will be reset to use Google’s search page as your home page when the browser is opened.
  8. Location
    Your location is preselected for you based on the IP address of the computer you are using.
  9. Next is the captcha to verify you are a human.
    An image with a word is shown.
    Below the image is a box for you to type in the word. There is a handicapped symbol to the right of the box for those visually impaired.
    Type in the word you see in the image.
  10. The last thing before creating your Google account is to read the Terms of Service agreement.
    Be sure to read Google’s Terms of Service and Privacy Policy if you are not familiar with them. The links provided on their page open in a new window.
  11. One last thing to do. Click the I accept. Create my account button.
Once you click the I accept. Create my account button you are taken to a screen showing confirmation that the account has been created.
Within the message on the page it tells you that Google has sent you an email to the address given and you have to click the link in that email to confirm the process.

Verifying Your Google Account

Once you clicked the Create my account button an automated email is sent to the email address you gave at the beginning of the account creation process.
In the email is a link for you to click to verify the account. When you click it you are taken to a page at Google Accounts thanking you for confirming your account signup. In the email you received it specifically says:
***NOTE*** Please print this page for your records. You’ll need your verification
link if you lose access to your account (for example, if you forget your username
or password).
So heed the warning by printing out the email and putting it somewhere safe!
Update February 10, 2011: Google has implemented a 2 step verification system. Matt Cutts, Google Spam Department talks about this here: Google launches two-factor authentication

Using Your Google Account

As described at the beginning of this article, there are lots of Google services available for you to use for free once you have a Google Account.
If you have not closed the Account Creation Confirmation tab/window yet, up in the top right is a link to My Account.
Once you click the My Account link you are taken to a page showing the Google services and features you have available to you.
Start by setting up a Gmail account or set up your Google profile. Maybe you would be more interested in Google Alerts, Adsense, Adwords or want to find a Google Group to join. None of those services of interest? Click the more link in the bottom right of the page to explore more Google services available.

Thursday, January 14, 2010

Delete a Desktop Shortcut

At times your desktop can get cluttered with desktop shortcuts and program icons making it hard to find things on the desktop and generally makes it cluttered.

When your desktop gets to a point where it is suffering from “desktop clutter” it’s time to delete a desktop shortcut or two.

Deleting a Program Desktop Shortcut

Deleting a program desktop shortcut does not remove the program from your computer. Moving the shortcut to the recycle bin only removes the program shortcut from the desktop.


Windows will remind you of this as you move the shortcut to the recycle bin:

Deleting the shortcut to (program name) only removes the icon. It does not uninstall the program…

Reference: Windows message window as you drop the program icon over the Recycle Bin

Deleting a File or Folder Desktop Shortcut

When you delete a desktop shortcut for a file or folder, unlike a program shortcut, you do not get a message from Windows.

Deleting a file or folder desktop shortcut which you created yourself does not remove the file or folder. It only removes the shortcut from the desktop.


If you downloaded something from the Internet to your desktop, then when you delete the shortcut, you will loose the program or file. See our Saving Downloads article for a better way to do this so you can include the file or program in your backup routine.

How to Delete a Desktop Shortcut

There are several ways to delete a desktop shortcut from the desktop in Windows.

Method 1

This first method to delete a desktop shortcut is quite simple:

  1. Move your mouse over the desktop shortcut you wish to delete and press the left mouse button.

    The icon will become selected and highlighted.

  2. With the icon still selected and the left mouse button still down, drag the desktop shortcut over to and on top of the Recycle Bin icon on the desktop.
  3. Release the left mouse button.

    If it is a program shortcut you are deleting, Windows will show a message (as explained above) and ask for confirmation.

    No message appears if the desktop shortcut is for a file or folder.

That’s it! You are done!


Missed the Recycle Bin? Then just repeat the instructions above, making sure this time you dragged the desktop shortcut over the Recycle Bin.

Method 2

  1. Left click the desktop shortcut to select it.
  2. Right click the desktop shortcut.

    A menu appears.

  3. Left click the Delete item on the menu that appeared.
  4. Windows will ask you to confirm deleting the shortcut.

    Just like our first method, you will get a message from Windows about deleting the shortcut if it is for a program. See the beginning of this article if you missed what the message says.

    For a file or folder shortcut, you will see a message from Windows asking for confirmation.


That’s it for method number 2.

Method 3

  1. Left click the desktop shortcut you wish to delete.
  2. On your keyboard, press the Delete button.

    The delete button is in the bottom left corner of the bank of buttons above your arrow keys, if you are using a desktop computer.

  3. You will get a message from Windows asking for confirmation.

    The messages for this method are the same as the ones for method 2 above.


Now that you know how to delete a desktop shortcut, there’s no excuse for your desktop to become cluttered with unwanted shortcuts.

Wednesday, January 13, 2010

Arrange Desktop Shortcuts

Continuing with our desktop shortcuts series, now that you have created a custom desktop shortcut, you are probably wondering how to organize all the desktop shortcuts you have.

  1. Right click your desktop.

    A menu appears.

  2. Left click the Arrange Icons By menu item.

    A new menu list appears.


Arrange Icons By

Once you left click the Arrange Icons By menu item, you have a number of choices.

The top section of the Arrange Icons By menu contains:

  • Name
  • Size
  • Type
  • Modified

The next section contains:

  • Show in Groups
  • Auto Arrange

    This is selected by default by Windows.

  • Align to Grid

    Align to Grid is also selected by default.

The third section in the Arrange Icons By menu contains:


  • Show Desktop Icons

    Selected by default

  • Lock Web Items on Desktop
  • Run Desktop Cleanup Wizard

Arrange Icons by Name

Select Name from the Arrange Icons by menu to arrange your desktop icons by the name underneath the icon.

Your standard Windows icons remain in the top left of the screen. Any other icons added by program installation or you added your self will be arranged in alphabetical order right under and to the right of the standard Windows icons.

If you have not edited the name of your desktop shortcuts you created yourself, then all the Shortcut to icons will be bunched together.


Arrange Icons By Type

Left clicking the Type menu item under Arrange Icons By will sort your icons by type, putting the applications first, right under the Windows default desktop icons.

Arranging by type would be useful to group all like icons together. i.e. all your Excel file types would be together, all your web page desktop shortcuts would be together, etc.

Auto Arrange

With Auto Arrange selected in the Arrange Icons By menu, if you wish to move icons around on your desktop (e.g. manually sort the icons into groups) you will find that Windows wants to pull it back over to the right and to the end of the group of icons it created. Frustrating! But you can arrange the icons any way you want…

To arrange the icons in any order or on any spot on the desktop, deselect Auto Arrange from the Arrange Icons By menu. Now grab the icon with your mouse and drag it anywhere you want on the desktop.

Align to Grid

By default Align to Grid is selected. This forces the desktop shortcuts to align to Windows predetermined grid on the desktop.

When you drag an icon to another spot on the desktop, it will snap to the closest grid spot thus creating typical spacing between icons both vertically and horizontally.


If this isn’t working out to your satisfaction, deselect the Align to Grid item in the Arrange Icons By menu, and then you can put the icons anywhere you like. With Align to Grid deselected you can put the icons closer together if you wish.

Show Desktop Icons

If for some reason your desktop icons have disappeared, select the Show Desktop Icons item in the Arrange Icons By menu. Your screen will flash and the icons will reappear.

Arranging desktop shortcuts is great way to keep your desktop icons sorted and organized. Play with the Arrange Icons By options and see which arrangement works for you.

Tuesday, January 12, 2010

Rename Desktop Shortcuts

When you create a desktop shortcut, by default Windows adds Shortcut to in front of the file or folder name the shortcut is for.

If you decide to use Auto Arrange to arrange the desktop shortcuts on your Windows desktop, all the icons with Shortcut to will be grouped.

Also, with Shortcut to added to the beginning of the name of the shortcut, the name of the file or folder the desktop shortcut is for may not be visible. By default, Windows only allows a certain amount of space below the desktop icon for it’s name.

Rename Desktop Shortcuts


It’s quite easy to rename a desktop shortcut.

  1. Left click the icon you wish to edit.

    The icon will become selected.

  2. Gently single left click the desktop shortcut name of the selected icon.

    The name will be highlighted and have a box around it.

  3. Now you can either select and delete the Shortcut to part in front of the shortcut name or select the whole name and retype what ever name you wish.
  4. Left click any empty area on the desktop to accept the new name.

That’s it! You are done!

Now that you have taken the time to rename desktop shortcuts they will be easier to read.

How to Create a Desktop Shortcut

In this second article about desktop shortcuts we will cover how to create a desktop shortcut for a file or folder on your computer and one for a web page on the Internet. In this article we will cover the following:

Create Desktop Shortcut for a File or Folder

When you use a particular file or folder a lot, placing a desktop shortcut to that file or folder on your computer desktop can save time. A desktop shortcut is also helpful for a novice computer user who might forget how to find a particular file or folder on their computer.

Creating a desktop shortcut for a file or folder requires navigating your way to the file or folder and sending a shortcut to the desktop.

  1. Navigate to the file or folder on your computer.

    If you are not sure where the program saved your file, open the program, create a new file and use the Save As function under the File menu of the program. This will show you the path to where the program saves files by default.

    Generally, Microsoft products will have saved your document in the My Documents folder unless you specifically changed where you wanted the file saved. Some programs do the same, under their specific folder. Others save the files created in with their program files in the Programs folder.

  2. Right click the file or folder.

    A menu will appear.


  3. Skim down the menu that appears and left click the Send To item on the list.

    A new menu appears

  4. Left click the Desktop (create shortcut) item on the list.

    This action creates a desktop shortcut to the file or folder on your desktop.

  5. Close or minimize all open windows.

Once you close or minimize all the open windows, your desktop appears. Look around for your new desktop shortcut. It is there, probably over on the right if you don’t have too many desktop shortcuts already.

The icon will be the program used to open the file if your shortcut is for a specific file. If the shortcut is for a folder, then the icon will look like a folder.


The name under your new file or folder shortcut will start with Shortcut to.

Pretty easy, wasn’t it. Now don’t go crazy adding a ton of shortcuts to your desktop. The desktop will become cluttered and you just might loose the time saving advantage of using desktop shortcuts.

Create Desktop Shortcut for a Web Page

If you visit or reference a web page on the Internet a lot, then you could either add the web page to your Favorites/Bookmarks or use a desktop shortcut.

  1. Open the web page in your browser

    You can practice with this web page.

  2. Left click the File menu item in the top of the browser.

    A list appears.


  3. Left click Send.

    A new list appears

  4. Left click Shortcut to Desktop.

    This action creates the shortcut on your desktop.

  5. Close or minimize the browser window.

    If you are practicing with this web page, then just minimize the browser.

Look on your desktop. There should be a new icon that resembles your browser icon for the web page you just created the shortcut for.

Saving Downloads to the Desktop

When saving downloads from the Internet, some sites will save a shortcut to your desktop

You may have done this yourself using the Save Target As feature.

The problem with saving downloads to your desktop is that it is harder to save the download to your backup. A better way to save downloads is to navigate to a folder you have created just for downloads and adding this location to your backup routine.

Sunday, January 10, 2010

Desktop Shortcuts

Ever noticed when you install a program an icon appears on your desktop? These icons are desktop shortcuts, which when clicked, open the program associated with it.

You can create your own desktop shortcuts also.

In this article we will cover:

Uses for Desktop Shortcuts

A desktop shortcut can be used to:

  • Save time getting to a specific folder on your computer.
  • Be a direct link to your favourite website.
  • A link to a specific program, folder or file on a network.
  • Create an email to person you send emails to regularly.
  • A link to a specific program on your computer or on the network you are

    connected to.

Those are a few ideas what a desktop shortcut can be used for.

Parts of a Desktop Shortcut

There are different parts to a desktop shortcut:

  1. The icon

    The shortcut icon is the picture you see on the desktop. A program specific icon will be specific to the program it is associated with. For example, the desktop icon for Outlook Express looks like an envelope. Internet Explorer’s desktop icon is an e.

    Windows also places icons on the desktop:

    • My Documents looks like a folder with papers going into it.

      This is the desktop shortcut to your My Documents folder on the computer.


    • My Computer is an icon with a monitor and computer tower.

      When double clicked you will see a folder icon for your shared documents, your documents, the hard drives on the machine and hooked up to the machine, the devices attached to the machine which contain or can be used for removable storage and any printers, scanners or cameras attached to the machine.

    • The My Networks icon is a computer monitor with a globe tucked in behind it.

      When the My Networks icon is double clicked, you will see all the computers within your home or office network you have access to. You could possibly also have network connections to the computers at work, if you are working from home or on your laptop.

      If you create your own custom desktop shortcuts,

      • the icon will appear as a folder when associated with a folder
      • the program icon that opens the file if it is a shortcut to a specific document
      • a browser icon with the web page title underneath if a shortcut to a web page
    • The shortcut arrow.

      The desktop shortcut may or may not have an arrow in the bottom left of the desktop icon.

    • The desktop shortcut name.

      Underneath the desktop icon is the name of the program, file or folder the shortcut will open.

    • The path the shortcut uses to access the program, file or folder the shortcut is associated with.

      To see the path of the desktop shortcut, right click the icon and select Properties from the list that appears.


Why Use Desktop Shortcuts?

Desktop shortcuts are quite useful. They:

  • Save time when you use a program, folder or file a lot.
  • Saves you remembering where on the computer, network or net a file is located. You can use the shortcut, instead of searching your computer for the item you wish to open.

The Downside of Desktop Shortcuts

The downside of using desktop shortcuts is that people tend to add too many to the desktop, creating desktop clutter.

To combat desktop clutter, you can:

  1. Arrange the desktop shortcuts into groups manually.

    Group the desktop shortcuts which are related together in a group on the desktop.

  2. Delete the shortcuts you no longer need (or don’t really need).

    When a shortcut is to a specific project file or folder, once the project is complete the shortcut can be deleted.

    Desktop shortcuts to programs on the computer you do not use often can be deleted also.

    The program is still accessible from the Programs list under your Start menu.

Desktop shortcuts are great little helpers when using your computer. Just be careful you don’t end up suffering from desktop clutter.

Saturday, January 9, 2010

Looking for nVIDIA driver ? Open this widget.

If you hard to find any nVIDIA VGA driver in all over the world, just go to this link down here :


sometimes we have problem in installing with cd driver, even more if your optical devices not so good, just search there. They have almost everything from 90's to 2k's.

But if u don't get what you want... use this link

What is the Internet

The Internet is a giant network of computers communicating with each other. Your computer connects to the Internet through a system of computers at your Internet Service Provider (ISP). The Internet Service Provider connects to other networks of computers to provide you with access to the Internet.

How the Internet Process Works

This is a very basic, simplified explanation of how the Internet works.

First of all there’s your computer. You have to have signed up with an Internet Service Provider (ISP) to gain access to the Internet. The connection can be through dial-up (your computer dials a phone number to access the Internet), cable (your Internet connection is provided by your cablevision company and is connected at all times) or ADSL (your computer uses the phone line and is connected to the internet at all times).

When you choose a website to visit the request goes to your ISP’s computer network. It sends out your request to the next computer in the system of the Internet structure. Your request could travel all the way around the world to find the website you are looking for.

Once the website has been found, the location information is sent back through the Internet structure to your ISP then to your computer’s browser.


In an ideal situation this whole process is instantaneous.

How fast you get to the website will depend on:

  • How you connect to the Internet.

    Dial-up will be the slowest. Cable is affected by the number of computers in the neighbourhood are on the same line.

  • Your computer.

    If your computer is low on memory, the disk is full, you have too many programs and/or documents open or a poorly maintained computer the computer has to work harder to present the web page in the browser.

  • Your ISP’s system.

    The ISP’s system of computers may have an internal problem that slows down the process of searching the Internet for the site you requested.


  • If the Internet structure computers and other hardware are not all working to their full capacity the whole process of finding the site and returning it’s location through to your computer can be slowed down.

    One broken or slow spot in the path can slow down the whole Internet.

  • How well the website has been designed.

    A poorly designed or coded website will be slow to load. The browser will have to work harder to render (present) the web page.

So there it is, a very simplified explanation of how the Internet works and how your computer, ISP, the Internet structure and web page design affect your Internet surfing experience.

Thursday, January 7, 2010

Saving Downloads

You can spend hours searching the internet for documents and programs that you need to learn more about a topic or increase the productivity of your computer use. You find a program to try out that seems to meet your needs or a document that you will need to reference in the future and want to save it to install or read later, how do you save/download files to your computer?

Saving downloads is not that hard, it just takes a bit of organization to be able to reinstall or find it later on your computer.

Save Download to Computer

You’ll need a specific spot to save all your downloads to. Having a specific folder for your downloads will make it easier to find them, back them up or install at a later time.

  1. Create a folder on your computer for all your downloads. This folder can be on another drive attached to your computer, on the main drive of the computer or if you are new to computers, create it in the My Documents folder.

    Within this folder you can have subfolders for specific needs, e.g. software, book research etc. This can be taken even farer by dividing the subfolders into more folders. e.g. the software folder could have folders within it for time management, word processing, graphics.


  2. Once at the page with the download you wish to save, click the download link with the right mouse button, a menu will pop up.

    Note:  Some websites that specialize in programs use automatic downloads therefore right clicking the link may want to save a web page. You don’t want this. Click the link instead and then proceed with the next step.

    If you have popup blockers turned on, you will get a message asking for permission to continue. Give the browser permission to continue. You can still follow the rest of the steps in this tutorial.

  3. From the menu that appears, left click the “Save target as” menu item.

    A new dialog box appears entitled Save As.

    You may get a security message window instead of the Save As dialog box. Left click the Save button in the bottom of the screen to proceed. Once the Save button is clicked, the Save As dialog box appears.


  4. In the top of the Save As dialog box, navigate to the folder you created to save/download files in by left clicking the arrow to the right of the top box.

    Left clicking the arrow to the right of the Save in box exposes a list of the drives on your computer, navigate to your downloads folder by clicking the drive it is on first, then the folder name.

  5. In the File name box in the lower part of the Save As dialog box will be the name of the program/document you are going to save.

    You can change the name to the left of the extension (the dot and three letters on the right of the file name) if it would help you recognize the file better in the future.

  6. The last box in the lower part of the Save As dialog box has the file type.

    The file type tells the computer what type of file this is and the computer will know which program to use to open it later (if you have the correct program to open it).

  7. Left click Save.

    A message screen appears showing the progress of the download.

    Once the download is complete, the title of the message screen will change to Download complete and 3 buttons will become available for use at the bottom.


  8. Now you have 4 choices of what to do next:
    1. Open – opens the file you just downloaded if it was a document.
    2. Run – runs the program just downloaded.
    3. Open folder – opens a new window showing the contents of the folder you just downloaded the file to.
    4. Close – closes the message window. You can left click this if your intent was to read or install this later.

Backing Up Downloads

We had you create a specific folder for downloads not only to help keep you organized, but to also make it easier to backup those downloads in case of a computer crash (breakdown).

Using a removable medium, backup the programs/documents you have downloaded!

  • You won’t have to search the internet for them again should your computer break down or is stolen.
  • The downloads would now be portable, say if you had to take to a meeting, work or school to work with further or do a presentation of your research.
  • Should your computer breakdown or if you get a new computer, reinstallation will go much faster with the files aready to go on a disk or separate drive.

Saving downloads saves time. Be organized and save/download files to one specific spot.

Wednesday, January 6, 2010

How to Make a Folder in Windows

To keep things organized on your computer, create folders for different documents, files and/or subjects.

Once your documents are well organized on the computer this will make it easier to find items and setup scheduled tasks like backing up your data.

Create a Folder in Windows

  1. On the desktop (main screen), right click the My Computer icon.
  2. Select Explore from the list that appears.

    The screen will change, exposing a window with two panes. On the left is a list of all your drives and on the right is a list of the drives sorted in categories.

  3. To keep things simple we are going to create a folder in My Documents. Click My Documents.

    The screen changes. The left side of the window lists all the folders already in the My Documents folder. On the right is a list of the existing folders in My Documents.


  4. Right click in any empty space in the right pane.
  5. Select New from the list and it will expand. Select Folder from the new list.

    A new folder is created at the bottom of the list of files and folders with the name New Folder. It will be highlighted if you haven’t moved the mouse.

  6. Type in a name for the folder. e.g. Letters
  7. Hit Enter key and the folder will have the new name you typed.

That’s it. You are done.

You will notice that the folder you just made is at the bottom of the list of files and folders. To sort the list in alphabetical order (folders automatically are listed first) right click in any blank area in the right pane and select Refresh. The screen will blink and the files and folders will be sorted in alphabetical order.


You don’t have to only create folders in My Documents. You can create them anywhere.

So now that you know how to make a folder in Windows, get those files organized! It will save you time searching for files.

Tuesday, January 5, 2010

Back Up Your Computer

Have you ever had your computer crash? Been infected with a virus, spyware or trojan? Or made the silly mistake of overwriting an existing file when you shouldn’t have? Installed a piece of hardware or software that made your computer malfunction? These type of things happen to everyone, experienced computer user or not.

If any of the above happens, you can loose everything. The operating system and programs can be replaced but your work (letters, pictures, etc.) can not unless you have performed a computer back up.

What is a Computer Back Up?

A computer back up is essentially a copy of the information on your computer. The copy can be a full back up, an incremental back up, a differential back up or a selective back up.

Types of Computer Back Up

As mentioned above there are different types of computer back up. Each will require a different amount of time to perform and may require a different type of back up medium.

Full Back Up


A full back up, as the name implies, is a back up of everything on the computer. The operating system, your settings, the software installed and your files are all backed up (copied) to another medium.

The full back up will take a long time to perfom (depending on the amount of information on the computer) and require the largest amount of back up medium.

Incremental Back Up

An incremental computer back up will back up only the files that have changed since the last back up was performed. The time to perform this type of computer back up and the amount of back up medium required will depend on how much has changed since the last back up.

Differential Back Up

A differential back up also backs up only the files that have changed but it keeps all the changes since the last full back up.

The differential back up time and storage requirements will also vary on the amount of changes since the last full back up. Seeing each change is added to the back up copy, the amount of back up storage required grows as time progresses.

Selective Back Up

With a selective computer back up, you select specific files and/or folders on the computer to be backed up.


Again, the time required and the amount of back up storage medium required will vary depending on how much has to be backed up.

What Should I Back Up?

Everything that can not be replaced needs to be backed up. This would include:

  1. The operating system if you do not have the original installation disks for the operating system.

    Computers with preinstalled operating systems may not have the original operating system installation files supplied with the computer. When purchasing a new computer, as for these. If computer supplier won’t give them to you, find another store or contact the operating system original supplier and ask for a copy.

  2. All the software that is installed on the system, especially if you do not have the original installation disks.

    Like the operating system, a new computer with software installed may not come with disks to reinstall the software.

  3. Your computer settings.

    All the customized settings you have set up should be backed up. If you can’t, no big deal, you’ll just have to redo them.

  4. Your email.

    Back up your email accounts, rules/filters, folders and messages.

    Backing up your email accounts, rules, folders and messages is very important, especially if you are running a business. Making a computer back up of your email items will also be a time saver if you have to restore the email program.

  5. Your data.

    Your data includes any letters, graphics, music, databases or other projects you have created on the computer.

    Each program you use will store your data somewhere on the computer but not necessarily in My Documents. When you install a program (or reinstall a program) try to have all the documents saved in one spot (e.g. My Documents). This will make performing a computer back up much easier.

    Note:  Some programs will not like having it’s default storage location changed. You will have to experiment to find out which do not like the storage location changed.


Computer Back Up Medium

There are various types of mediums that can be used for backing up the computer. The type required will depend on the type of computer back up being performed and the amount of information being backed up.

Some ideas for computer back up mediums would be:

  • Tape back up

    A tape back up can hold lots of information. This type of back up medium can be slow to use and be costly for an average computer user.

  • CD-R or CD-RW

    CDs and CD-RWs can be a more cost effective alternative. You will require some software to be able to write to the cd.

    CD-Rs you can only write to once. You cannot replace the information on the cd with updated information. It can appear that you have erased something from the cd but you have not reclaimed the space on the cd for use again.


    CD-RWs on the other hand, can be rewritten. It would be more cost effective in the long run if you paid the higher price for this back up medium if you have information that is continually changing and being resaved. When a CD-RW is erased, the space is reclaimed and therefore reusable. A program like Nero which compares what is on the CD with what you wish to copy to the CD can then overwrite old versions of files if you wish.

  • External Hard Drive

    An external hard drive is investment worth considering the time to reinstall things and the number of disks that would be required if a lot of information has been backed up.

    The added benefit of an external hard drive is that it is portable (if you go on a business trip you can take it with you) and can be stored somewhere secure for safe keeping.

Performing a Computer Back Up

There are various ways to perform a computer back up:

  • Back Up Software Included with the Machine.

    If you are using a computer with Windows installed Microsoft has a back up utility included with the operating system. With this back up software you can select the type of back up you wish to perform, what to back up and specify a regular schedule to perform the back up.


    Note:  I have found this back up software time consuming and a drag on the resources of the computer.

    If you cannot find Microsoft’s back up utility in your list of programs, go to the Control Panel, select Add or Remove Programs, select Add/Remove Windows Components, find Microsoft’s back up utility in the list of components and install it.

  • Third Party Computer Back Up Programs

    There various third party computer back up programs on the market. You will have to try a few out to find the one that works the best for your requirements and skill level.

    I have tried a few but have found SyncBack meets my needs right now. Like Microsoft’s back up utility, you can select the type of computer back up to perform, what to back up and set a schedule.

  • CDs

    Using cds and manually backing up your information via the cd writing software maybe the right option for you. You could have seperate cds for different purposes so it is easier to find like items when reinstalling/restoring items to the computer. I have the miscellaneous programs I like to use on one or two cds and specific projects on other cds.


  • External Hard Drive

    If you are going to use a computer back up program with or without a schedule the external hard drive will have to be connected at the time you wish to back up the computer.

    As mentioned above, the advantage of the external hard drive is that you can take it with you when working away from your base computer on your laptop or at another computer.

  • System Restore

    Windows XP has something called System Restore within the operating system. This program has to be turned on to be useful. What System Restore does is records the state of the machine at different intervals, daily and when software or hardware is installed/removed.

    In the event of a small problem, assuming System Restore has been turned on, you can restore the system to a state when it worked properly if there is not any major damage.

    Note:  Do not rely on System Restore a the only computer back up system you use. If the computer fails or if there are serious problems with the operating system you will not be able to restore the computer to a previous state. The System Restore also does not over write your data. So if it doesn’t over write your data, then it isn’t backing it up either!


Computer Back Up Tips

Here are a few tips when organizing your computer back up:

  • Keep in mind that a full back up being restored on to a new hard drive will require that the new hard drive be set up identically to the old hard drive or the software being used to restore your information may not work.
  • Keep your computer back up medium organized! If the back up is spanned across multiple disks for example, they have to be used in the same order when restoring as they were written in.
  • Always store your computer back ups in a safe place. In a business situation storing them off site would be a good idea in case of fire, flood or break in.
  • Back up on a regular basis. A computer failure can happen at anytime and without notice so being prepared will save you a lot of grief.
  • Schedule the computer back up for a time when you know the computer will be on! If you are going to use the schedule feature of the back up software, the computer has to be on at that time. This is something someone who is new to computers or not very familiar with computers tends to forget or does not realize. Yes the computer keeps time when it is off (there’s a little battery in the computer that does this besides a few other things which are beyond the topic of this post) but all scheduled updates and programs need to computer to be on and the operating system loaded to perform the tasks.

  • Keep the files you use the most often backed up more regularly. Files that change or are added frequently need to be backed up more often than other parts of the computer. A daily back up of these items might be prudent if you work on the computer a lot.
  • If you are using a computer back up program, have it verify the files once the back up is complete. This will check that the back up is a good working copy of the files. If the back up is faulty, it isn’t much use to you later when you need it.

    If you have done the computer back up manually buy selecting specific files (e.g. Burning specific files to cd), just try opening them once backed up to make sure the copy works.

Hopefully you now realize why it is important to perform a computer back up, how to perform a computer back up, what is required to back up a computer and that having a regular computer back up schedule (manually or automatic) will save you from loosing important information on the computer and ultimately save yourself time and grief should you have to restore the computer.

Change Screen Resolution On the Fly

Ever wish you could change the resolution of your monitor on the fly?

Sometimes web pages are built with such small font or images that they may not be readable on your monitor. Or, if you are building a web page yourself you should check the page in different resolutions to see how others with different resolutions will see your page.

There are plugins and programs you can download to do this but there is also an easy way to change screen resolution on the fly in Windows.

To Change Screen Resolution on the Fly in Windows

  1. Minimize the browser window and all other windows you have open by clicking the minus button in the top right of each window. You could also right click each open window’s name in the taskbar (usually across the bottom of the screen) and select Minimize.
  2. Right click any blank area of your desktop.
  3. Select Properties from the list that appears.
  4. Select the Settings tab (far right tab).
  5. In the bottom left is a section called Screen Resolution that contains a sliding rule. Left click the indicator and slide it. This changes the resolution of your monitor.

    Sliding it to the right will decrease the resolution (make things appear bigger on the screen and less of the web page is visible).

    Sliding the indicator to the right will increase the resolution (make things appear smaller and more of the web page is visible).

  6. Click Apply.

    The screen will flicker and the resolution will be adjusted.

  7. Left click the browser name in the taskbar and the browser window will maximize.

Pretty easy isn’t it.


Changing the resolution back to your original settings or experimenting further is just as easy. Just follow the instructions above and make your changes.

If you clicked the Apply button as you changed the resolution the Display Properties dialog box will still be open. Just slide the indicator either left or right to adjust.

When you are finished experimenting click the Ok button to set the resolution and close the Display Properties dialog box.

Buy with VirtaPay DMCA.com YouRoMail.com

 
Design by Free WordPress Themes | Bloggerized by Lasantha - Premium Blogger Themes | Affiliate Network Reviews