Thursday, November 17, 2011

How to Eat Great and Lose Weight


Snacking on dried out rice cakes and wilted lettuce leaves is no way to spend your mealtimes. You don’t have to eat bland, boring foods just to trim up. It is possible to eat great and lose weight all at the same time. If you choose quality foods and have a willingness to try new things, you can get down on delicious meals and shed pounds too.

Choose the Right Foods


You can’t possibly lose weight if the foods you use to prepare you meals are unhealthy and loaded with calories. When you avoid processed nonsense and stick with fresh ingredients, you can’t go wrong. Anything boxed, frozen, jugged or canned is considered processed and has no place in a healthy diet.

Foods that should be staples in your healthy meal plans include fresh fish, naturally raised meats, organic poultry, organic whole eggs, raw nuts, fresh herbs, and fresh fruits and vegetables. Natural foods are better for you because they are low in calories and filled with plenty of nutrients your body can use.


Also, natural foods aren’t loaded with a laundry list of additives that contribute to weight gain, diabetes, cancer, hypertension and other health problems.

Experiment with Recipes, Flavors and Cooking Methods


I love grilled chicken, but if I had to eat if every day, I’d go bananas—I imagine you would too.  Free yourself from the bondage of humdrum, tasteless meals by experimenting with recipes. Thumb through cookbooks, surf the Internet and use your imagination to whip up meals you can’t wait to sink your teeth into.

When you come across recipes that have unhealthy ingredients, simply swap the bad ingredients out for healthier ones. For instance, if a recipe calls for milk, you can replace this ingredient with coconut or almond milk. Also, don’t be afraid to switch out spices and seasonings to add a new flavor to a dish.


Vary your cooking methods to keep things fresh and give food a different taste. For instance, if you always broil your steak, try sautéing it, or covering it with olive oil and dropping it on the grill. All of these cooking methods are healthy and easy to master.

Sample Recipes to Help You Eat Great and Lose Weight


Healthy French Toast:
  • 2 slices of Sprouted Grain, Spelt or Rice bread
  • 1 tablespoon of real butter
  • 2 whole organic eggs
  • maple syrup
  • cinnamon

Directions
: Mix the eggs in a bowl. Dip the bread in the egg mixture until it is completely coated on both sides. Heat a pan on low to medium heat and add the butter. Once the butter is melted, add the egg coated bread and cook each side for 3 to 4 minutes. Sprinkle the toast with cinnamon and serve it with 2 teaspoons of maple syrup.

Baked Chicken a la Isabel (one of my creations)
  • 1 whole baking chicken
  • extra virgin coconut oil
  • your favorite Italian spices (I use thyme, parsley, oregano, garlic powder, sea salt and pepper)

Directions
: Preheat the oven to 350 degrees. Place 2 tablespoons of coconut oil in a small pan and melt it over low heat. Mix 1 to 2 teaspoons of each of your spices in a small bowl and pour in the melted coconut oil. Mix all the ingredients together. Let the spice and coconut oil mixture cool.

Rub the spice and oil mixture under the skin of the chicken with your hands. Once the chicken is completely coated, place it breast side down in a glass baking pan and pop it in the oven. Let the chicken cook for 1 to 2 hours until it’s done.

There’s nothing boring or tasteless about the above recipes. If you’re creative and are willing to experiment with new recipes, you can chow down like this everyday and look fantastic doing it.

Your dream of permanent weight loss is just a reach away. Watch this video to find out how The Diet Solution Program can help you eat great and lose weight.

Did you like this article? Share it with your friends on Facebook.

Friday, July 22, 2011

Google+ (Google Plus) Invitations Give a way

plus.google.com (Google+) is the fastest growing website in history, according to analytics firm comScore. As of July 24, less than one month after the Google plus test site was launched, 25 million invitation-only users are organizing, sharing, and communicating with people through Google’s Circle technology.

Do you need an invitation to Google+? Click here to use on of our 150 available invitations, and add yourself to Google+!
Social networks are only as interesting as the content they provide to the user, that content coming in the way of status updates and posts from users in your network. Google+ has quickly become a major social network, and users are looking for more ways to search for and connect with other Google Plus users. Would you like to find more users to interact with on Google+, increase the usefulness of your network, and fill your stream with news and information that closely matches your own interests?

Google+, a social network operated by Google, Inc., launched on June 28th, 2011 with integrations across a number of Google products, including Buzz and Profiles.
One key element of Google+ is a focus on targeted sharing within subsets of your social group, which are what Google calls Circles. Circles are simply small groups of people that you can share to, each with names like friends, family, classmates and co-workers.

Also within Google+, Google has created a section specifically for viewing, managing and editing multimedia. The photo tab takes a user to all of the photos he or she has shared, as well as the ones he or she is tagged in. It’s not just photo tagging, though: Google+ includes an image editor (complete with Instagram-like photo effects), privacy options and sharing features.

Another feature that’s widely discussed is “Hangouts,” Google’s new group chat feature. Instead of directly asking a friend to join a group chat, users instead click “start a hangout” and they’re instantly in a video chatroom alone. At the same time, a message goes out to their social circles, letting them know that their friend is “hanging out.” Friends can then join the hangout as long as they have been placed in a circle that was invited by the person who created the Hangout.

Monday, January 18, 2010

How to Install Google Analytics on Blogger

Google Analytics Blogger LogoWouldn’t it be nice to know how many people actually visited your blog each day? How about knowing which of your posts are the most popular? Well surprisingly Blogger doesn’t currently offer any native blog analytics but fortunately there is Google Analytics — available for free.
Google Analytics is a great tool that will show you all sorts of useful information about how people found your blog, keywords they searched on to find you, where they came from and even how long they stayed. You’ll learn more about where your visitors come from and how they interact with your blog. This is a must tool if you are trying to build a profitable blog otherwise you are flying blind!

This article will show you how to add Google Analytics to your Blogger blog. It’s a fairly simple process and doesn’t require any technical skill at all.


Step #1 – Setup a Google Analytics Account

Go to Google Analytics and sign in using your Blogger login. If your account doesn’t work for some reason, you can create a new one instead. Once you login you’ll see a screen that looks like this:

Google Analytics Blogger Sign Up Step 1

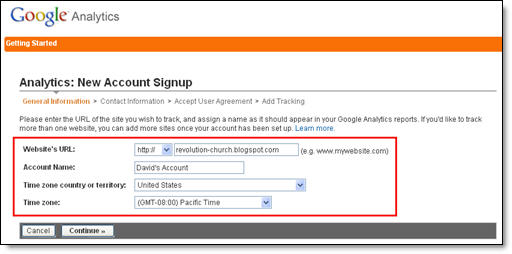
Click on the “Sign Up >>” button and proceed to the next step which will ask you for your general information. Website URL, Account Name, Country, and Time Zone. The screen will look like this:

Google Analytics Blogger Step 2

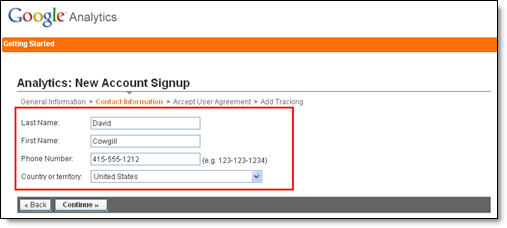
If you noticed, I just put my Blogger url (without the http://) and called it “David’s Account” because this is your top-level container for 1 or 100 different websites so it’s a good idea to name it something more general. The next step will ask you for your contact information which includes your first name, last name, phone number, and country. Easy so far right? :-)

Google Analytics Blogger Step 3

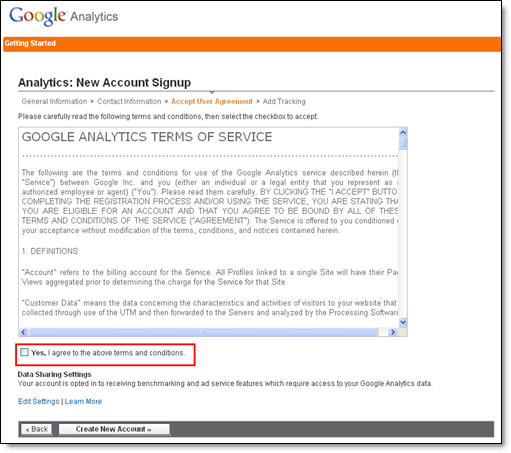
Your last step in signing up will ask you to accept the user agreement terms and conditions which you should read (just kidding…who actually ever reads these entire legal terms anyhow?).

Google Analytics Blogger Step 4

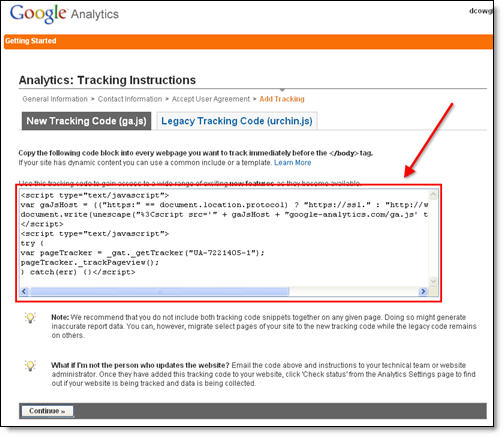
Now this next screen is very important. This is the code you will need to copy and paste into your blogger template. Go ahead and click into the box and it will automatically highlight the entire block of code for you. Now you need to copy that code and paste it into notepad or into a MS Word document. Save it as you’ll need to use it later.


Google Analytics Blogger Step 5

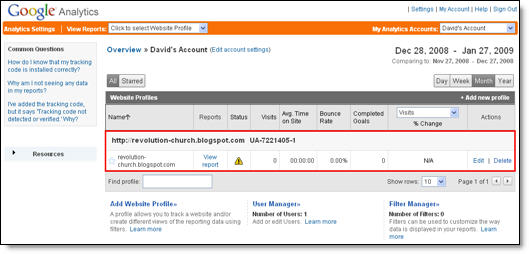
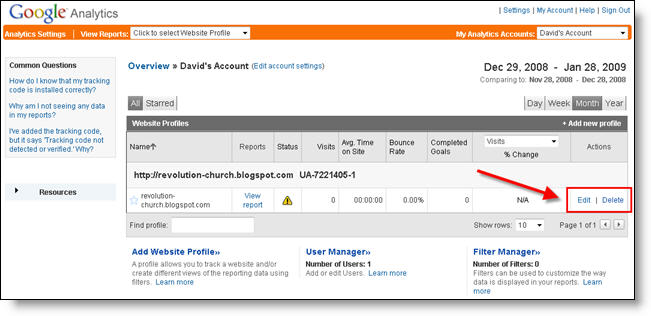
After you click on the “continue >>” button you will be taken to your brand new Google Analytics dashboard! You will see your blogger blog listed but with no analytical data….yet.

Google Analytics Blogger Dashboard

Ok, now you are done with setting up your Google Analytics account. The next step is placing the tracking code into your Blogger template so it can report back to Google Analytics and provide you with some cool data points.

Step #2 – Adding GA Tracking Code to Your Blogger Template

This is not a very difficult step even if you are afraid to touch your template code. Login to your Blogger account and then click on the “Layout” => “Edit HTML” tabs. This will bring you to the template code. Before you make any changes, I advice you to back up your template just in case there are any problems. After you’ve done so, continue reading.


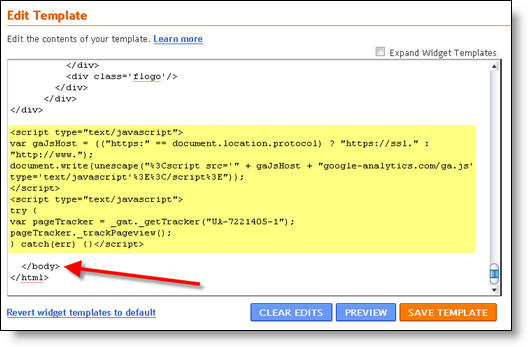
Now in the edit template html code window, scroll all the way to the bottom of your template code and look for the </body> tag. There should only be one of these closing tags in your template. If you can’t find it then your template wasn’t properly created and you should add one right above the </html> tag.The </html> tag should always be your last line of code in your template. It signifies the end of your template.

Ok, now go back to the code you saved before in a Word Doc from Google Analytics. You are going to copy it and paste it right above the </body> tag as illustrated in the image below. The yellow highlighted code is the new GA code I just pasted into my template.


blogger google analytics code 2

Save your template and you shouldn’t get any error messages. If you do, it’s most likely not related to this GA code and something else with your template itself. Assuming you’ve been successful with your save, you are all done embedding the GA code in your template!

Step #3 – Confirm Google Analytics is Tracking

Go back into your Google Analytics account and look at your dashboard. Most likely you will see a little yellow exclamation mark under the “status” column that looks like this: google analytics tracking not installed. This means everything isn’t working properly yet which is fine because we are about to tell GA we just added the code. From your dashboard, click on the “edit” link which is located to the far right.

Google Analytics Blogger Dashboard Edit

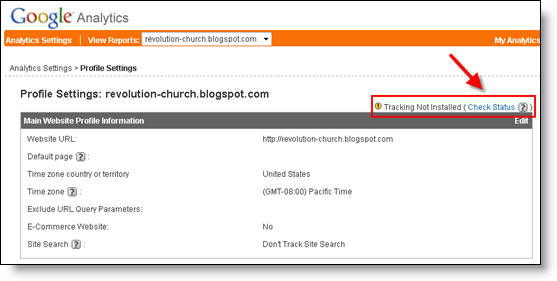
After you click on that link, you’ll see another screen like below. It will say “Tracking Not Installed” followed by a link “Check Status”. You’ll want to go ahead and click on that link which will tell GA to visit your site and look for the new code you just pasted in your template.

Google Analytics Blogger Dashboard Check Code

Assuming you pasted the code in there as instructed above, GA will find the new code and begin tracking everything on your blog. If you are still having problems, it’s most likely something to do with GA and you should read their help guide to troubleshoot your problem.

Google Analytics Blogger Dashboard Success

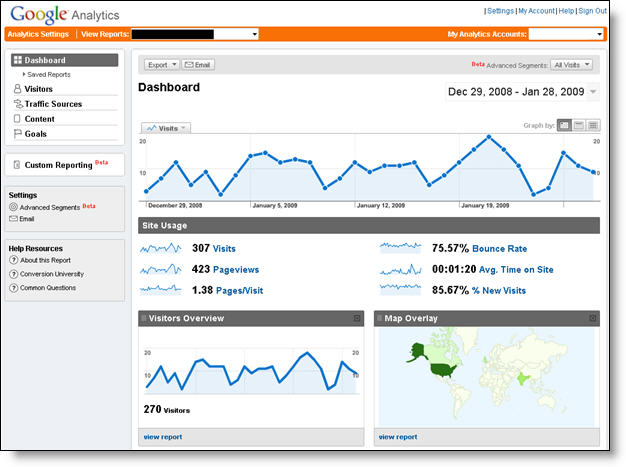
The message seen here, “Waiting for Data” means you have correctly setup GA and data is being gathered! Click on the top left Google Analytics logo and it will take you back to your dashboard. From there click on the “View report” link and that’s where all your very important Blogger visitor data will start appearing!


Google Analytics Blogger Dashboard Results

Now it usually takes an hour or so before you will see any data (maybe longer if you don’t get much traffic to your blog) so please be patient. Trust me, you’ll be logging in at least once a day just to see how much traffic your blog is getting. It’s very addicting and powerful information to learn from. You’ll be surprised which posts are your most popular and what countries people are coming from to read your blog.

Google Analytics is very powerful and we have just learned how to install it into your Blogger template. We haven’t even scratched the surface on the features and reporting it can do. For most Bloggers, this will be enough. Data will be collected and you will just review it. Others with more in-depth goals (like selling products or services, creating a sales funnel, etc) will want to spend more time learning GA. Hope you enjoyed the tutorial and don’t blame me for your new found addiction!

Saturday, January 16, 2010

Create a Google Profile

Thought of creating a Google profile? With a Google profile page you can:

  • Share your content on the web.
  • Links to your blogs.
  • Online photos from Picasa and Flickr.
  • Links to your other online profiles like Facebook and LinkedIn.
  • Create a bio about yourself on your About tab.
  • Provide contact information and enable send me a messge.

Create a Google Profile

  1. You will need a Google account first.
  2. Go to Create Your Profile at Google.
  3. Over on the right is a button Create my profile, click it.

    Switches to Google account login box


  4. Log into your Google account.

    Next screen asks you to update your password recovery information. Update it then click Save and continue button at the bottom of the page.

    You now are taken to your profile page.

  5. In the top right, beside your login name there is a Edit my Profile link, click it.

    You are taken to the Edit your profile page. On your Edit your profile page the About tab is activated.

About Tab Google Profile

  1. On the About tab the first part is where you:
    • Fill in your first and last name.
    • Upload a picture of yourself.
    • Fill in your nickname.
    • Other names.
    • What sex you are. There is the option to not to say if you prefer to keep this confidential.

    To the right of your name section you have the following choices:

    • To display your full name so you can be found in searches.
    • Allow people to contact you without knowing your email address.
    • To display those who you follow and the people who are following you.
  2. The second part of your About tab is where you can enter more personal stuff about you:
    • Where you grew up.
    • Where you live now and where you have lived.
    • What your profession is, current employer, past employers and schools you are currently attending or have attended.
  3. There is a box a bit lower down on the About tab where you can add a short bio.

    An HTML editor is available to format your text and add links.


  4. Below the bio section is where you can add links.

    This is where you can add links to your other online profiles and website.

  5. Check your information over. Google shows you your profile link to share.
  6. Scroll down to the bottom of the page can click Save changes.

That’s it! You have now completed the About tab of your Google profile.

Photos Tab Google Profile

The photos tab is where you add a photo strip at the top of your profile.


  1. Click the Photos link beside the About link at the top of the screen.

    Switches to the photo editing screen.

  2. Picasa is selected by default.

    If you do not have a Picasa account yet or if you photos are not public, Google will let you know it can not find one for you using this user name/Google account.

    Click add photos if you have a Picasa account under this user account.

  3. The next option is Flickr.

    Click the circle (radio button) beside Flickr if you want to add photos from your Flickr account.

    Enter your Flickr username, ID, or email address the click the Check button to the right.

    Click the Add photos button below to add photos from your Flickr account.


  4. The third option is where you can add another photo service you use.

    Click the circle (radio button) beside Other photo service.

    Fill in the url or feed of your photo service you wish to add then click the Find feed button to the right.

    Click the Add photos below to add photos from your other photo service.

You are now finished adding photos to your Google profile.

Next thing to fill out is your contact information.

Contact Info Tab Google Profile

There is a note on the this screen that the information you enter on this page is not public unless you decide to make it public.


  1. Click the Contact Info link beside the Photo links at the top of the screen.

    Switches to the Contact Info screen.

  2. On the Contact Info screen you can add:
    • Email addresses
    • Addresses
    • Phone numbers including your mobile
    • Instant messenging user name
    • Your birthday (just month and day)
  3. Next select who can see this contact information.
    • Your contacts group
    • Your friends group
    • Your family group
    • Your co-workers group
  4. When you are all done, scroll down to the bottom and click Save changes.

With your Google profile now complete, you can start sharing your profile link with friends, family, co-workers and anyone else you wish.

Be sure to keep your Google profile up to date. It is yet another way for people to find you on the net!

Friday, January 15, 2010

Create Account at Google

Create Google Account

To use the services available at Google you need a Google account first.

What Services Can I Access with My Google Account?

Google provides a number of services. Below are a few of the services you might use as a business owner:
  • Google Profiles
  • Gmail
  • Webmaster Tools
  • Google Analytics
  • Google Alerts
  • Google Groups
  • Google Documents
  • Google AdWords

Security Note Regarding Google Accounts and Services

Your Google Account is hooked up with all the Google Services you use therefore, if you decide to have someone manage your Google Analytics account for you they will have access to all the other services you use at Google. Consider creating a separate account for the business services you will be using for your website so if you hire someone to manage these services for you, they don’t have access to your Gmail account or any other personal services you use at Google.

How to Create an Account at Google

Before you can create an account at Google you will need an email address and a strong password in mind The password needs to be at least 8 characters long.
  1. Go to the Create an Account page.
  2. The first piece of information they ask for is an email address. This will be part of your login information.
    Fill in an existing email address you have.
  3. Next, they want a password.
    Type in your chosen password in the box next to Choose a password:
    Over on the right of the box where you typed the password it will indicate how strong your password is.
  4. In the next box down retype your password.
  5. Decide if you want to stay logged in.
    By default the stay logged in box is checked. This puts a cookie on the computer where you are working to keep you logged in at Google. This is fine if the machine is your own but if you are doing this on a public machine (e.g. at the library) then uncheck it because you probably will forget to log out when you leave. If you don’t logout at the library then the next person to use the machine has access to your account.
  6. The next thing to consider is Web History.
    Creating a Google Account will enable Web History. Web History is a feature
    that will provide you with a more personalized experience on Google that
    includes more relevant search results and recommendations.
    What this means is Google is going to track what sites you visit and then start presenting sites in the results that they think suit your past web searching history.
  7. Default Homepage is next. It is checked by default to change your homepage to Google.
    If you leave this checked, the homepage of your browser will be reset to use Google’s search page as your home page when the browser is opened.
  8. Location
    Your location is preselected for you based on the IP address of the computer you are using.
  9. Next is the captcha to verify you are a human.
    An image with a word is shown.
    Below the image is a box for you to type in the word. There is a handicapped symbol to the right of the box for those visually impaired.
    Type in the word you see in the image.
  10. The last thing before creating your Google account is to read the Terms of Service agreement.
    Be sure to read Google’s Terms of Service and Privacy Policy if you are not familiar with them. The links provided on their page open in a new window.
  11. One last thing to do. Click the I accept. Create my account button.
Once you click the I accept. Create my account button you are taken to a screen showing confirmation that the account has been created.
Within the message on the page it tells you that Google has sent you an email to the address given and you have to click the link in that email to confirm the process.

Verifying Your Google Account

Once you clicked the Create my account button an automated email is sent to the email address you gave at the beginning of the account creation process.
In the email is a link for you to click to verify the account. When you click it you are taken to a page at Google Accounts thanking you for confirming your account signup. In the email you received it specifically says:
***NOTE*** Please print this page for your records. You’ll need your verification
link if you lose access to your account (for example, if you forget your username
or password).
So heed the warning by printing out the email and putting it somewhere safe!
Update February 10, 2011: Google has implemented a 2 step verification system. Matt Cutts, Google Spam Department talks about this here: Google launches two-factor authentication

Using Your Google Account

As described at the beginning of this article, there are lots of Google services available for you to use for free once you have a Google Account.
If you have not closed the Account Creation Confirmation tab/window yet, up in the top right is a link to My Account.
Once you click the My Account link you are taken to a page showing the Google services and features you have available to you.
Start by setting up a Gmail account or set up your Google profile. Maybe you would be more interested in Google Alerts, Adsense, Adwords or want to find a Google Group to join. None of those services of interest? Click the more link in the bottom right of the page to explore more Google services available.
Buy with VirtaPay DMCA.com YouRoMail.com

 
Design by Free WordPress Themes | Bloggerized by Lasantha - Premium Blogger Themes | Affiliate Network Reviews